Account
All of DerScanner personalized settings are stored in Account. You can navigate there either from the system side menu, or alternatively, by clicking on your login just under DerScanner’s logo.
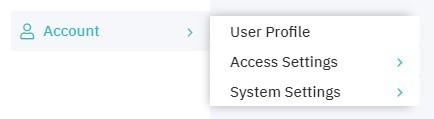
Figure 4.22: Account
Profile
On the Profile page, you can:
- view account stats
- view license restrictions
- set up notifications
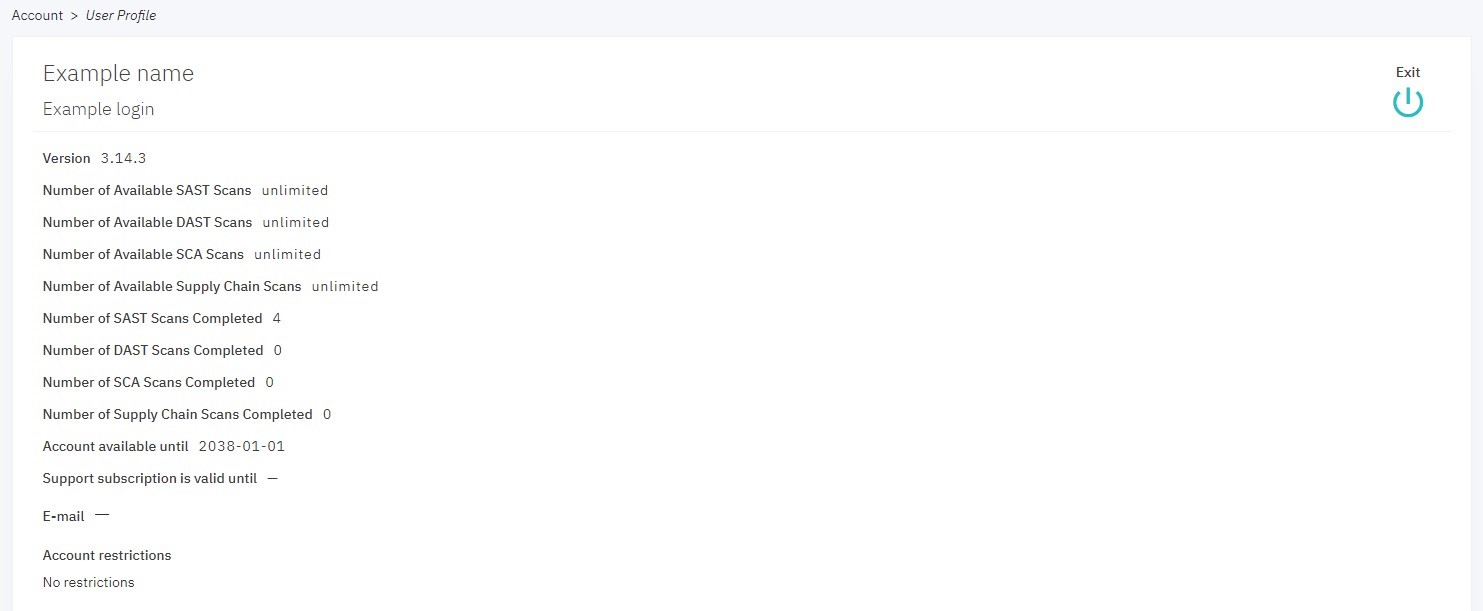
Figure 4.23: Profile
If you wish to receive email notifications upon scan completion, use the toggle switch. If needed, a brief summary of scan results and statistics on languages can be included into the message. An error message can be added to the notification in case of a scan failure.
Access Data
Token and Password
On the Token and Password tab, you can obtain an active authorization token.
Authorization token allows to authenticate a user to perform certain actions without using DerScanner UI (e.g., run scans directly from CLT or automate system actions through scripting). To obtain an authorization token:
- Press Create token.
- Enter account password.
- Define token validity period.
- Press Get Active Token.
An authorization token will appear in the respective field. Information on all active tokens in the system will be displayed lower in the table.
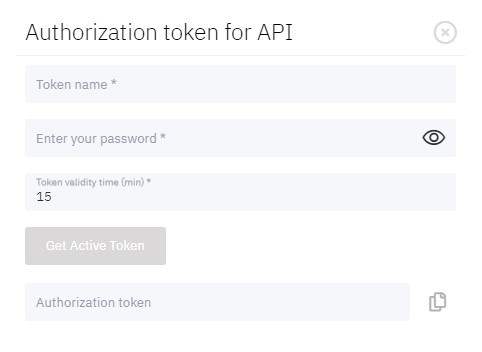
Figure 4.24: API authorization token
As an information security requirement, your password should be regularly rotated. You will be notified about changing your password shortly to its expiration.
To change password:
- Enter current password.
- Enter new password and re-enter it in the text field below.
- Click Save.
Unless you change your password prior to its expiry, you will be automatically logged out from the system and will be required to set a new password to log in.
Task Manager
DerScanner provides an out-of-the-box integration with Jira in order to minimize manual effort when transferring security incidents to issue tracking tools.
To link a Jira account:
- Enter Jira server URL.
- Enter Jira account login and password.
- If needed, select the Ignore self-signed certificates option.
- Click Link Account.
You can also Unlink Account or Check Connection with your Jira server from here.
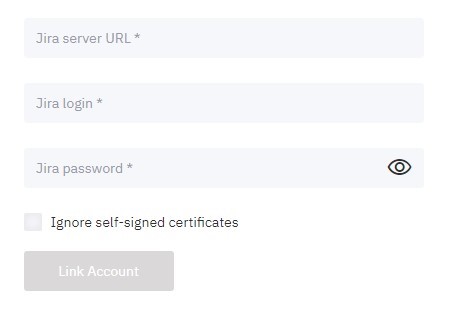
Figure 4.25: Linking a Jira account
Repositories
In the Private Repository section, you can store and manage credentials required to scan files from private repositories. Accounts that are stored in this section can be used for multiple projects within the system.
You can store 5 types of credentials:
- login and password — provide username and password for the resource that requires authentication
- access token — provide a valid token used for authorization on a resource
- SSH key — provide a private SSH key (can be typed manually or uploaded as file) and configure the client if needed (to edit, first deactivate the corresponding toggle switch)
- headers — used exclusively for DAST scans; provide the respective values from the Request Headers section of the developer’s panel for web-resource authorization
- authorization form — used exclusively for DAST scans; fill in all of the fields, except for the regex patterns in logged in/out responses (providing any one is sufficient for authorization)
To edit the data or configure other users’ access, select a corresponding account from the list.
This data can also be provided prior to scanning in the scan settings. If you select the Use credentials for rescanning option, the system will store it encrypted in the project’s settings for subsequent scans.
Presets
Scan
In the Scan section, you can configure presets for scanning. Presets are designed to simplify project configuration. You can choose one of the existing presets or create new to set up the frequently used analysis settings in one click.
You can set, change or remove your default preset for scanning. If your current default preset gets removed from the system or you decide to not choose one, you will start the analysis with the preset selected by your system administrator. Unless the administrator chooses one, the system preset will be used by default.
For easy navigation across presets, use the search bar. The bar supports search by preset name or author.
Create New Preset
To create a new preset:
- Click Create Preset to open the preset creation page.
- Set the preset name.
- Click the Default Preset checkbox to make the preset your default option for scanning.
- If needed, add the preset description.
- Specify, whether the preset will be public or private. A public preset will be available to all system users. A private preset will be available only to the preset author and system administrators.
- A preset contains information on the configuration of the following settings:
- analyze languages
- Java, Scala, Kotlin settings
- C/C++ settings
- JavaScript settings
- general settings
- Git repository settings
- private repository settings
- charset settings
- rule sets
- Press Save. After the successful saving, the system will transfer you back to the Scan section.
Please notice: you will have to manually update your presets, accordingly to the system updates. For example, when a new programming language support is added, you will need to check the respective checkbox in the Analyze languages settings if you want it to be analyzed.
Edit Preset
To edit an existing preset:
- Click on the preset name to open the preset editing page.
- Make changes to the preset.
- Press Save to apply the changes. After the successful saving, the system will transfer you back to the Scan section.
To delete the preset, press the Delete button once open.
Please notice: while you can work with the presets created by other users in the system, you won’t be able to make changes to those entities. Your actions will be limited to:
- viewing the preset
- selecting the preset as your default preset for scanning
- making a copy of a preset to create your own preset based on that copy
Report
In the Report section, you can configure presets for security reports. For easy navigation across presets, use the search bar. The bar supports search by preset name or author.
Create New Preset
To create a new preset:
- Click Create Preset to open the preset creation page.
- Set the preset name.
- Click the Default Preset checkbox to make the preset your default option for scanning.
- If needed, add the preset description.
- Specify, whether the preset will be public or private. A public preset will be available to all system users. A private preset will be available only to the preset author and system administrators.
- Configure the preset’s visibility on the Export Report page of a project.
- A preset contains information on the configuration of the report settings. More about export settings in Export Report.
- Press Save. After the successful saving, the system will transfer you back to the Presets > Report section.
Edit Preset
To edit an existing preset:
- Click on the preset name to open the preset editing page.
- Make changes to the preset.
- Press Save to apply the changes. After the successful saving, the system will transfer you back to the Presets > Report section.
To delete the preset, press the Delete button once open.
Data Migration
This section offers tools to transfer projects between different DerScanner instances. Both project groups/projects and standalone scans are eligible for migration.
Export
Adjust the toggle switch position to work with projects or separate scans and select the data to export.
For project groups, the following information will be exported:
- project group with its projects
- project settings (private repository settings are exported in the project settings (associated keys from Account > Access Data are not transferred); user rights are not transferred)
- source code (for SAST projects) and detailed results (including event log)
- scans (archived scans are not exported)
- scan info including the file if the Save the uploaded file feature was enabled, and logs (scan author is not transferred)
- rules (including custom rules) that were violated by detected vulnerabilities (for SAST projects)
- SCA databases that were violated by detected vulnerabilities (for SCA projects)
For projects, the following information will be exported:
- project
- project settings (private repository settings are exported in the project settings (associated keys from Account > Access Data are not transferred); user rights are not transferred)
- source code (for SAST projects) and detailed results (including event log)
- scans (archived scans are not exported)
- scan info including the file if the Save the uploaded file feature was enabled, and logs (scan author is not transferred)
- rules (including custom rules) that were violated by detected vulnerabilities (for SAST projects)
- SCA databases that were violated by detected vulnerabilities (for SCA projects)
For scans, the following information will be exported:
- scan
- source code (for SAST projects) and detailed results (including event log)
- scan info including the file if the Save the uploaded file feature was enabled, and logs (scan author is not transferred)
- rules (including custom rules) that were violated by detected vulnerabilities (for SAST projects)
- SCA databases that were violated by detected vulnerabilities (for SCA projects)
Please notice: if different DerScanner instances have different versions of SAST rules and SCA databases (including custom rules), these rules will only affect the imported projects. You will still have access to these detections on the new instance, but unable to use them for other projects.
Import
To import projects to the new DerScanner instance:
- In Data Migration > Import, upload the archive exported from another DerScanner instance.
- Provide the archive password.
- Select the files you wish to import.
- If you’re importing separate scans, choose a project on the new instance that will host the imported scans.
- Click Import.