Restore a backup
Video walkthrough: Back Up and Restore DerScanner from the DerSecur Control Panel (YouTube).
Restore replaces the installed product's data with the selected backup. It does not change the product version. To return the version after an update, use Return to the previous version after an update. Schedule maintenance and retain server access. The destination must already have a compatible installed product with the matching version and edition and the expected data directories and volumes. This command does not deploy Core onto a blank server. When replacing a lost server, prepare that compatible installation before applying its complete backup. Backups record the edition: a backup of the other edition is refused. A backup made by an earlier DCP has no edition record; the restore then warns, so make sure it comes from a server of the same edition. On a replacement server the licence is bound to that server's Installation ID: after the restore, if DerScanner reports no valid licence, request a licence for the new server's Installation ID and load it (see Licence and first product sign-in).
- Select the intended server and open Backups. Compare the running product version in Products with the backup version.
- Find a completed copy and inspect its date, size, databases and state. A complete copy reads Not checked (Restore verifies it): the restore checks every file before it changes anything. Unfinished copies (Unfinished, No checksums, Damaged) have no restore action. A copy of another version reads Cannot be restored on …, and a copy of another edition says that it cannot be restored here; in both cases the button is disabled with an explanation, and when a return path exists the panel points to returning the previous version. While a restore is unfinished, the other copies are disabled: "The restore from … was interrupted: finish it first".
- Press Restore on the appropriate row. Read the confirmation: it names the server, the backup path and the time the backup was made, says that DerScanner on that server stops and its data are replaced, and that the scans, projects and users made since then are lost. A safety copy of the current data is made first.
- Type the displayed server name and confirm Restore. Cancel closes the dialog without starting. An incorrect name does not enable confirmation.
- Follow the operation. Backup files are checked before changes. For a large backup, checking can take more than 2 minutes before the plan is shown: the panel says so and lets you start the restore, which checks every file again before anything changes and stops if the backup does not fit. If integrity validation fails, retain the error; do not remove checksum files or replace individual pieces of the backup.
- Wait for the final result ("The data of the backup … are back. DerScanner works with them."). If the backup was made on another server, the result tells you to sign in to DerScanner with the administrator credentials of the server the backup came from; otherwise sign in with the admin password that was valid when the backup was made. Check DerScanner access, licence, services and data at the intended date. Do not assume work created after the selected backup is present in the restored state. The data that the restore replaced stays on the server: it is listed under Put aside by a restore (or Kept after upgrades and restores) as Data replaced by a restore and in
sudo dcp status. It takes disk space. When the restored state is confirmed, remove it with Clean up now (on Overview: Remove the replaced data) orsudo dcp cleanup; what is deleted cannot be brought back. - For an externally stored copy, the administrator transfers the complete directory to the server. There is no browser upload of a backup file here. When needed, use
sudo dcp restore /PATH/TO/COMPLETE-BACKUPon the server and read its confirmation carefully.
The restore checks free space on every disk the data goes to, including the safety copy, and refuses before any change if it is short; free space there and run it again. After interruption, do not switch arbitrarily to another backup. Open Overview and use Finish the restore when offered for the unfinished operation; the dialog names the server and the backup, and you type the server name to confirm. To go back to the data that were there before the restore instead, restore the safety backup the message names. Retain the original backup and journal until the outcome is resolved.
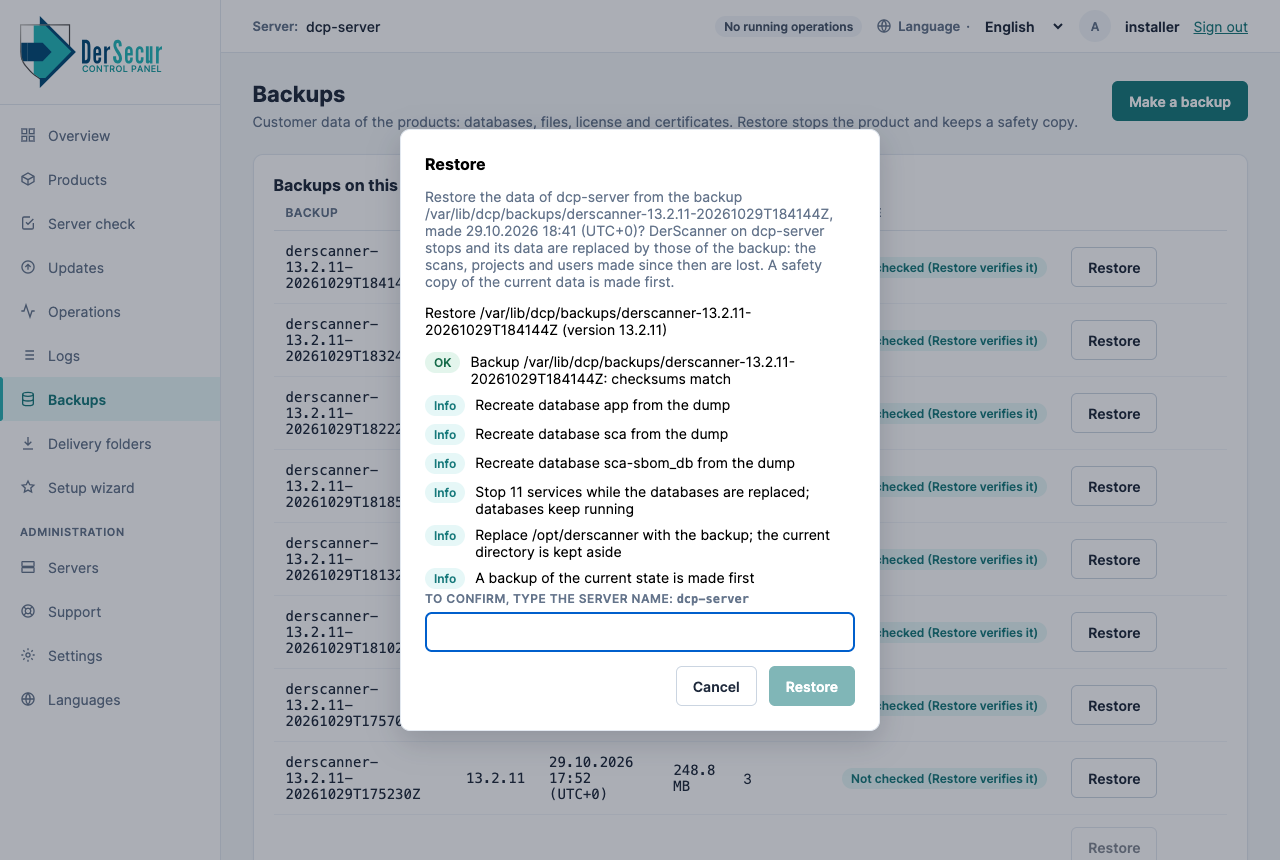
Confirmation of a restore: the server name is typed to confirm.